In this series, I will try to explain what you need to know on how to make a small modpack for you and your friends to play. This guide will explain you how to get mods, how to add them. Sorting oregen, looking at configs, and much much more. I have decided to split this guide up in parts. I will try and explain everything, so you are ready, to build your own modpack.
If you ever feel something is missing, just contact me. Either by using the contact form on this blog, or tweet at me. As of this writing I don’t know how many parts this series will be in.
This first part, will show you on how to install and setup MultiMC, make your first instance. Setup memory settings. Download and add your first mods. And other tips.
But lets start from the beginning.
First you need a program to sort your mods with. This guide wont focus on getting a public pack. But only to explain you how to make a small pack for you and your friends to play. I recommend using MultiMC. It’s a program to handle multiple instances with. MultiMC is free and an open source launcher. It is in this case used to handle your minecraft instance with mods. You could use the normal vanilla client to do this with. But i find MultiMC easier to use, once you understand the basics on how it works. It can handle multie instances each with their own mods, texture packs, saves, configs etc. Meaning you can even use it to play vanilla Minecraft, ATLauncher or even FTB packs with, so you have everything in one place.
Downloading And Setting up MultiMC:
To begin download MultiMC:
Go to: https://multimc.org/.
- Scroll down to the “Download & Install” section.
- Get either the Windows, Mac or Linux version (This guide will use the Windows version)
- It will now download a zip file.
- Unzip / Drag the content of the zip file out to your desktop, or where ever you want to store it at.
- If done this right, you should now see a MultiMC folder. Open it, and run the “MultiMC.exe” file. You should now see this:

- Select your Java Version. You should select the one with a “Star” next to it. Hit “Ok” once its selected. Make sure you have the 64bit version of java. “Architecture 64” if you only have 32. You have to uninstall Java 32bit, and get 64bit version of it.
- Now go up in “Accounts” (Top right corner) and select “Manage Account”
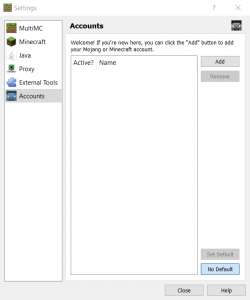
- You should now see this windows:
- Click “Add” and insert your email/username and password for your Minecraft account. Same account you use for minecraft.net / ATlauncher / FTB /Curse / Technic etc
- Click “Ok” once you have added the information, and click close. Your account should now be added.
Now it’s time for some memory settings.
- If you want to track and use MultMC to play your FTB Launcher packs, you can press the “Track FTB Instances” and you will have your FTB packs in MultiMC too. This is a optional feature. If you don’t want it, just skip it.
- Now click on “Java”
- I recommend you use these settings. Minimum Memory at 512MB, Maximum at 4096MB. You can increase permgen to 256MB, but that’s only if you use Java 7. Java 8 do not use permgen anymore.
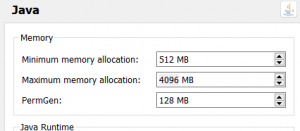
You have now completed the setup of MultiMC, and its now time to begin making your first instance.
Making your first instance:
It is now time to make your first instance with a few mods. In this part 1, i will show you how to add Forge, and add a few mods like NEI and a map.
- You should now see this window.
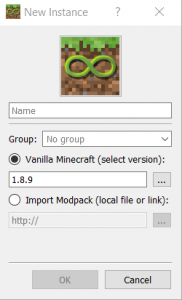
- First let us give it a name. I will call it “Our First Pack”.
- Now click on the 3 small dots, that’s next to 1.8.9.

- You will now see this window:
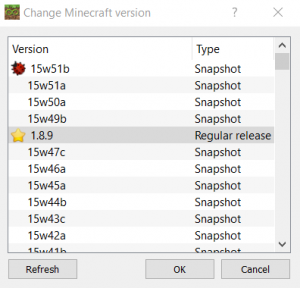
- Here it’s possible to select the Minecraft version, you want to use. I am in this guide going with 1.7.10 as that’s the most modded version at the moment. So scroll down, and find “1.7.10” once it has been chosen, press “Ok”.
- Now it should look like this
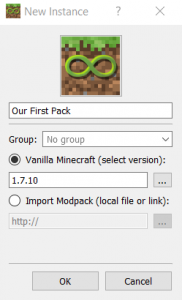
- Press “OK”
- You should now have an icon that’s called “Out First Pack”
- We now need to install Forge to it. Forge is what makes us able to add mods to Minecraft. You do this by right clicking on your instance, and select “Edit Instance”. You should now get a window that looks like this
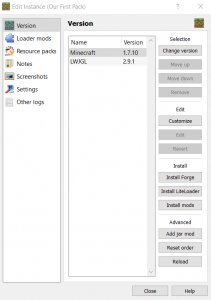
- Now select “Install Forge” on the right side.
- You will now get a big window, with a lot of numbers. This is all the Forge versions. The version with the star next to it, is the recommended version. And its also the version we are going to use. To mark it, and press ok. Now close the window.
- Now it’s time to run your instance. So double click on the instance, and let it load. It will now get Forge and setup the instance
- You should get a screen that looks like this once the pack has loaded up.

- .
- Make sure there is written “Minecraft Forge XX.XX.X.XXX” on left corner, as that makes sure you have done it correct. If there is not written all this, you have not installed Forge the correct way, and need to go back in the guide.
- If everything is as above screenshot, then press “Quit game”
- Now right click your instance “Out First Pack”, and press “Change Icon”. Find a icon you like and press “Ok” I have chosen the “gear”. The instance should now look like this, if you have choosen the gear.
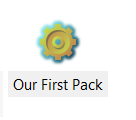
You have now made your first instance. Made java memory settings, installed forge, changed icon. It’s now time to add some mods.
Adding a few mods:
One of the most important mods in 1.7.10 is Not Enough Items. Not Enough Items is what that let you search ingame for an item, and it will then find the recipe for you. First we have to download the mod. Go to http://chickenbones.net/Pages/links.html select 1.7.10 at “Minecraft Version”. And download both “CodeChickenCore” and “NotEnoghItems”. We need the “universal” version. So select “Universal” next to each mod, and get the latest version.
Once downloaded, it’s now time to add them. Usually a mod states if it needs a coremod, either at the place you have got it from, or if the mod crashes (More on that later). A coremod is a mod, another one needs for it to work, that’s the simplest explanination. With Not Enough Items, CodeChickenCore is needed.
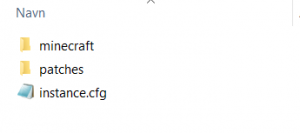
Now right click your instance. And select “Instance Folder”, you should now see this:
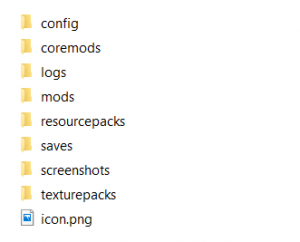
Open the “minecraft” folder. And you will see this:
Here there is different folders.
Config – Here each mod you adds, configuration files is stored. Something we will look at in next part of this guide. Here you can change settings of each mod you install. The configuration files can first be seen once you have added a mod and ran it the first time.
Coremods – Is a folder that was used in previous modded minecraft versions. Here you would add coremods like CodeChickenCore. Something that’s not done in 1.7.10.
Logs – This folder contains logs of Minecraft. Something you won’t need for this guide.
Mods – Contains all the mods you want to add.
Resourcepacks – Is here you add your resourcepack you want to use. Like Sphax, Soartex etc.
Saves – Here is stored all your save files / worlds.
Screenshots – Here is stored all the screenshots you take ingame.
Texturepacks – Is not something that is used in 1.7.10, but was used in previous Minecraft versions. Now it’s the resourcepack folder that is being used.
To add Not Enough Items and its coremod which we downloaded earlier.
- Open the “mods” folder.
- Drag and drop the two files you downloaded from the website (NotEnoghItems and CodeChicken. The folder should now look like this:

- Now close the folder, and run the instance. Once it has opened, make a world and check that NEI works. If it does, you have done it all correct, and can move to next part of this guide.
Now that NEI have been added, and you can search for items ingame. It’s now time to add a map. I have decided to go with JourneyMap. You can find it here: http://minecraft.curseforge.com/projects/journeymap-32274/files now get the 1.7.10 version (As of this writing I have chosen journeymap-1.7.10-5.1.3) now follow the same steps as with Not Enough Items, and put the mod in the “mods” folder. Now start your world, and check that both NEI and the map works. The map should be disabled by default in the top right corner.
Where To Get Mods:
So you have been wondering on where to get mods? Well i use 3 sites. Mainly because i trust them, and they are easy to use. Its important to use the right sites, so you are sure you don’t download mods that contains viruses.
These are the sites I use, when i search for mods:
https://bot.notenoughmods.com/1.7.10.html
http://www.curse.com/mc-mods/minecraft
http://www.minecraftforum.net/forums/mapping-and-modding/minecraft-mods
You have now successfully added NEI, and JourneyMap. And this first part of this guide series is completed. I will be updating this one, if I find any errors or things that can be changed. Part 2 of this guide, will teach you how to change configurations, managing ore generation, which tool to use for that, and much more. So stay turned on this blog, and be sure to follow my twitter. You can go to part two at: https://kehaan.me/?p=412 when you feel like you have mastered this part 1.
Changes to Part 1:
10-01-2015: Published the guide.
15-01-2015: Fixed some spelling errors.
16-01-2015: Added part 2 link.
